What Your Clients See
Your clients interact with a portal that is separate from your coach dashboard. Understanding what they see helps you set expectations, answer questions, and avoid confusion when discussing plans or progress.
This page walks through every part of the client experience so you know exactly what is on their screen.
Your branding, not ours
Clients see your brand name throughout the portal — in the header, in welcome messages, and on any communications. If you set a brand name in your profile (e.g., "Peak Performance Coaching"), that is what appears. If you have not set one, the portal falls back to showing "Assistant Coach."
This means the portal feels like an extension of your coaching business, not a third-party tool.
The intake experience
New clients who are in the Intake stage see a focused, single-purpose screen:
- A welcome message with your brand name
- A "Start intake form" button to open the form you assigned
- A brief message explaining that the form helps you build a plan tailored to them
If you have not assigned an intake form yet, they see: "Your coach is preparing your intake form. Check back soon." No broken links or empty pages.
Once they submit the intake form, they automatically move to the Active stage and gain access to the full portal.
The active client portal
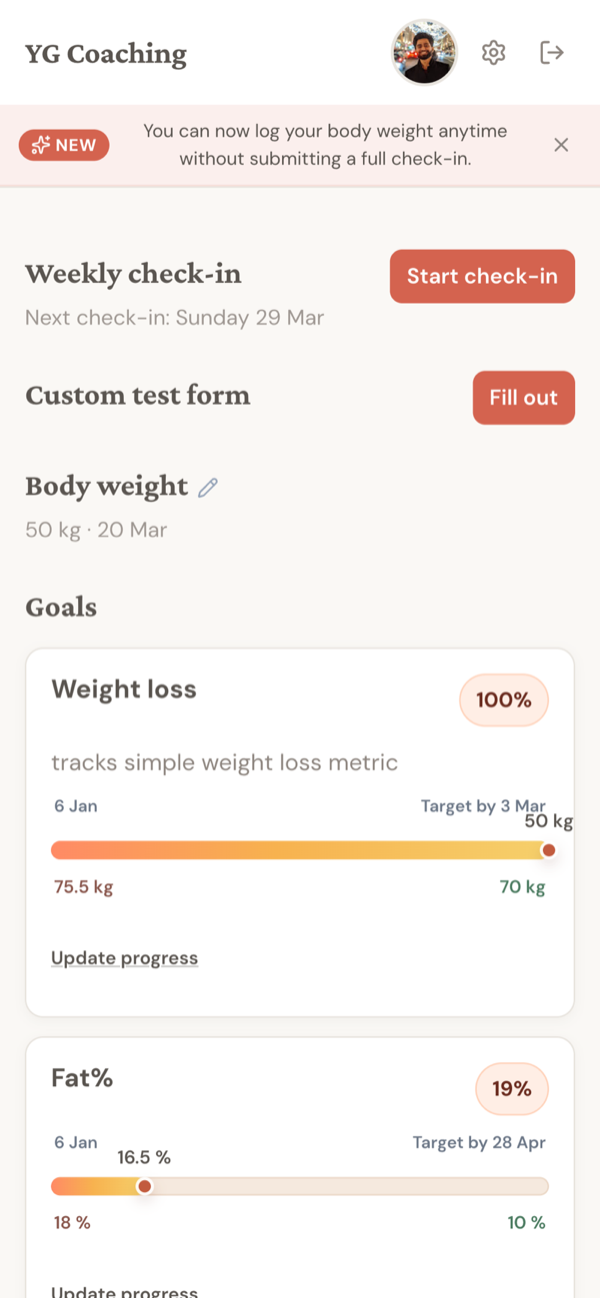
Active clients see a home page organized into clear sections. Everything they need is on one screen.
Weekly check-in
This is the most prominent section. It shows:
- Their next check-in date, based on the check-in day you configured
- A "Start check-in" button to begin their weekly submission
- If they started a check-in but did not finish, the button changes to "Continue check-in"
Check-in forms auto-save as clients fill them in. They can start entering measurements, close the browser, and come back later without losing progress. This is worth mentioning to clients who worry about losing data mid-submission.
Goals
Active goals appear with visual progress tracking:
- A progress bar showing percentage toward the target
- Current value vs. target value
- Start and target dates
- Any description or progress notes you have added
For manually-tracked goals (like exercise PRs or qualitative targets), clients see an "Update progress" button to log their current value. Auto-tracked goals — such as weight or exercise goals tied to workout logging — update on their own without client input.
Clients can also toggle to view their completed goals, with achievement notes. This is a useful motivational reference they can look back on.
Plans
Active meal plans and workout plans appear as cards:
- Meal plan card with a "Download PDF" button
- Workout plan card with a "Download PDF" button and access to the workout logger
If you have not assigned a plan, the client sees "No plan assigned yet" — clean and unambiguous.
Recent check-ins
The last 3 check-ins appear on the home page with a "View all check-ins" link. Each card shows the submission date and a summary. Clients can open any check-in to review their submitted data and read your response.
Additional forms
Any feedback forms or custom forms you have assigned appear here as well, with buttons to fill them out.
What happens when you activate a plan
When you activate a meal plan, the client immediately sees a new card on their portal with the plan name and a "Download PDF" button. The same applies to workout plans, with the addition of workout logging access.
If you update a plan and re-save it, the client's next PDF download reflects those changes automatically. You never need to email PDFs or tell clients to re-download — they always get the latest version.
When you deactivate a plan, it disappears from the client's portal. Activating a different plan replaces it.
Check-in submissions from the client side
When a client taps "Start check-in", they step through the form you designed — measurements, subjective questions, photo uploads, and anything else you included.
Key details about the client experience:
- Auto-save: Progress is saved as they go. No "submit" anxiety.
- Photo uploads: Clients take or upload progress photos directly in the form. Photos upload in the background.
- Completion: After submitting, the check-in appears in their history immediately.
From the check-in history page, clients can browse all past submissions. They see their measurements, their subjective feedback responses, any progress photos they uploaded, and your coach response (if you have written one). This gives them ownership of their data and the ability to track their own journey over time.
How goals appear to clients
Goals show up on the portal home page as cards with progress bars. Clients see:
- The goal name and metric (e.g., "Body Weight — 75 kg")
- A visual progress bar
- Their current value and target value
- Start date and target date
For manual goals, the client taps "Update progress" to enter a new value. This is the only way they interact with manual goals — they cannot edit the goal itself, change the target, or delete it.
For auto-tracked goals (weight, exercise weight, exercise reps), the system updates progress automatically from check-in data or workout logs. The client does not need to do anything.
Completed goals move to a separate view that clients can access to see what they have achieved.
The workout logger
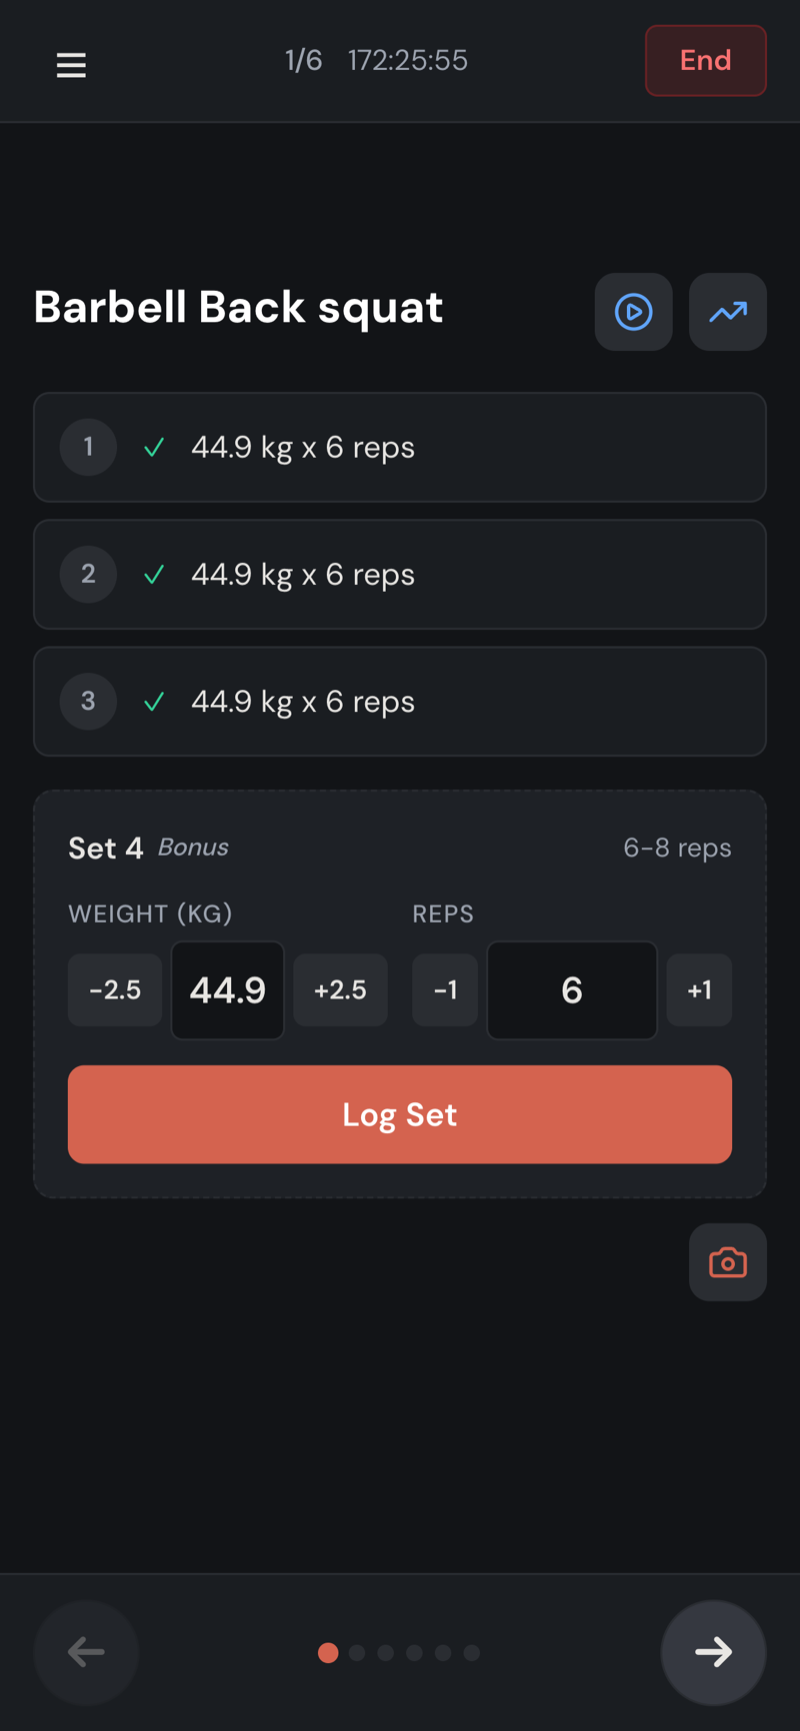
When you activate a workout plan, clients gain access to a full workout logging interface. This is the most interactive part of the portal.
Starting a session
Workout sessions appear as cards on the portal. A smart suggestion highlights the next session based on what the client did last, with a "last done X days ago" label. Tapping a session shows a pre-workout overview with all exercises, prescribed sets and reps, and any coach notes.
Tapping "Start Workout" enters a full-screen, dark-themed workout mode designed for gym use. The screen stays awake automatically.
Logging sets
The interface adapts to the exercise type:
- Weighted exercises: Weight and reps fields with smart pre-fill from the client's last session. Quick-adjust buttons for small increments.
- Bodyweight exercises: Reps field with an optional added-weight toggle.
- Duration exercises: Built-in stopwatch with manual override.
- Cardio exercises: Duration, distance, and pace fields (varies by cardio type).
Clients can log more sets than prescribed (marked as bonus sets), skip exercises, or complete fewer sets than planned.
Coach notes in the logger
Clients see any exercise notes and weight notes you added when building the plan. These appear inline during the workout, so your coaching cues are visible exactly when they are needed.
Exercise videos
Clients can record video of any exercise during a workout. A camera icon appears on each exercise — tapping it opens the device camera. Videos upload in the background without interrupting the workout. This is useful for form checks that you review later from your dashboard.
Rest timer and navigation
After logging a set, a full-screen rest timer appears using the rest period you configured. Clients can adjust the timer or skip it. They navigate between exercises by swiping or using the exercise drawer menu.
Ending a workout
When the client taps "End", they choose Complete or Abandon (for early exits). Either way, all logged sets are preserved. A summary screen shows total duration, exercises completed, volume, and any personal records hit during the session.
Offline support
Workout logging works fully offline. If the client loses signal in a basement gym, they keep logging normally. Data syncs automatically when connectivity returns.
PDF downloads
Clients download meal plan and workout plan PDFs directly from their portal. The download always pulls the latest version — if you update a plan, the next download reflects those changes.
This means you never need to email PDFs manually. Point clients to their portal and they always have the current version.
What clients cannot see
The portal is intentionally limited. Clients do not have access to:
- Your coaching notes or to-dos
- Other clients' information
- Form templates or the form builder
- Backend settings or configurations
- Anything from the coach dashboard
The portal is read-only except for three actions: submitting forms, updating manual goal progress, and logging workouts. Clients cannot modify plans, change their check-in schedule, or alter settings. That is all on your side.
Setting expectations with clients
When onboarding a new client, it helps to briefly explain what they will find in their portal:
- "You will get a link to your portal where you can submit your weekly check-ins, see your plans, and track your goals."
- "Your meal plan and workout plan are always available as PDF downloads — you do not need to wait for me to send them."
- "If you have a workout plan, you can log your sessions directly in the app. I will be able to see exactly what you did."
- "After each check-in, I will write a response you can read in your check-in history."
Keeping it simple avoids overwhelming new clients. They will discover the rest as they use it.
Related guides
- Onboarding a New Client -- the full coaching workflow from intake to first check-in
- Your Intake & Check-in Forms -- designing forms that collect the right data
- Reviewing Client Workouts -- what you see on your side when clients log sessions