Creating Workout Plans
The workout plan builder lets you create structured training programs organized into sessions, each filled with exercises from your library. Clients see the active plan on their client app and can download it as a PDF.
Opening the builder
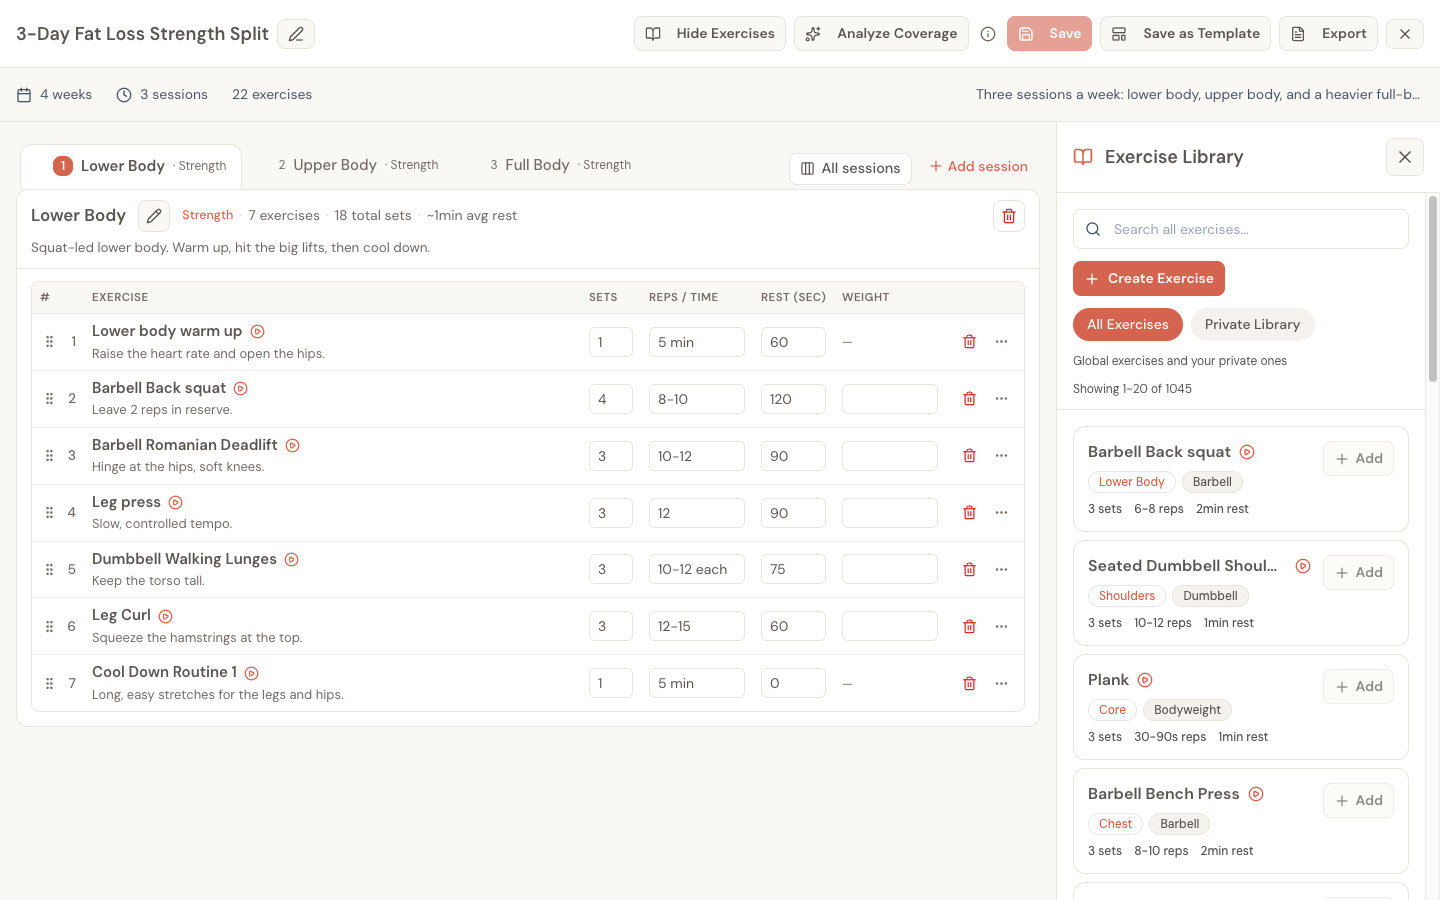
From a client's dashboard, go to the Workouts tab and click Create Workout Plan. This opens the builder in a two-pane layout:
- Left side — Your plan: one tab per session, and the open session's exercises
- Right side — Exercise library: search, browse, and add exercises
Plan details
At the top of the builder, you'll set the plan metadata:
- Plan name (required) — e.g., "Phase 2 — Hypertrophy Focus"
- Description — A brief summary of the program
- Duration — How many weeks this plan runs (1–52)
- Notes — Internal notes for yourself (not shown to the client)
A summary bar below the header shows the plan at a glance: duration in weeks, number of sessions, and total exercise count.
Building sessions
Click Add session to create a training session. Each session represents a single workout day.
For each session, you can set:
- Session name — e.g., "Upper Body Day 1", "Leg Day", "Full Body A"
- Session type — e.g., "Strength", "HIIT", "Cardio" (optional, shown next to the session name)
- Session notes — Instructions or reminders for this specific workout
Sessions auto-name themselves ("Session 1", "Session 2", etc.) and default to "Strength" type, but you can rename and retype them.
Reordering sessions
Drag sessions by the grip handle to reorder them. This lets you arrange the training week however you want — push/pull splits, upper/lower, or any other structure.
Session stats
The top line of each session shows its name, then a quick summary: the session type, the number of exercises, the total sets, and the average rest. Any session notes sit on the line below.
Use it as a quick sense check while you build. If one day carries far more sets than the others, or its average rest is much shorter, that's the session most likely to run long or leave your client flat for the next one.
Click the pencil next to the name to rename the session or change its type and notes. The bin at the far right deletes the session, after you confirm.
Adding exercises
Open a session's tab, then add exercises from the library panel on the right.
Search and browse
- Search — Type to search by exercise name, muscle group, or equipment
- Browse — When not searching, you'll see popular exercises sorted by usage
- Filter by scope — Toggle between "All Exercises" (global + your custom ones) and "Private Library" (only exercises you've created)
Adding to a session
Click Add on an exercise in the library. A small Add to sessions window opens with the session you're looking at already ticked; tick any others you want it in too, and confirm.
The exercise is added with its default parameters from the library:
- Sets — Number of sets (default: 3, range: 1–10)
- Rep range — Text field like "8-12", "5x5", or "AMRAP" (default: "8-12")
- Rest period — In seconds (default: 90, range: 0–600)
Configuring exercises
Each exercise is one row, laid out like a spreadsheet. Click a box and type — there's no Edit button to press first:
- Sets — How many sets (1–10). For timed exercises such as a warm-up or a plank, this is the number of rounds.
- Reps / time — Any format you like: "8-12", "10 each side", "AMRAP", or a time such as "45s" or "5 min".
- Rest (sec) — Rest between sets, in seconds (0–600).
- Weight — Load guidance such as "RPE 8", "60% 1RM" or "20kg". For cardio this box holds the target instead, such as incline or pace. Leave it empty when you want the client to choose their own load.
A few keys make it quick to fill in a whole session:
- Tab moves to the next box, then on to the next exercise's boxes. Shift+Tab goes back.
- Enter moves straight down to the same box on the next exercise — handy when you're working down one column, like setting rest for the whole session.
- Esc puts back what was there before you started typing.
A dash (—) means that box doesn't apply to that exercise: a timed warm-up has no weight, and exercises inside a superset share the group's rounds and rest.
Notes
An exercise's note sits in lighter text under its name. Click it to change it. To add a note to an exercise that doesn't have one, hover over its row and click + Add note next to the name. When you're done, click anywhere else, or press Cmd+Enter (Mac) / Ctrl+Enter (Windows).
Keep each note to the one cue that matters most for that client — "ribs down", "pause at the bottom", "use the neutral-grip handle". Your client reads it mid-workout, between sets, so short beats complete.
More options for an exercise
The ⋯ at the end of each row holds the less common actions:
- Request a form video (on a client's plan, once it's been saved) — ask the client to film this exercise next time they log it. A small video icon then appears next to the exercise name. See Requesting Form Videos.
- Group with another exercise — turn it into a superset or circuit. See Supersets & circuits.
- Move to another session (when the plan has more than one) — send it to a different day in the plan.
The red bin next to the ⋯ removes the exercise from the session.
Reordering exercises
Drag an exercise by the six-dot handle at the start of its row to move it up or down the session. With a keyboard, click the handle and use the Up and Down arrow keys.
To move an exercise to a different session, drag it by the same handle onto that session's tab, or choose Move to another session from its ⋯ menu. It lands at the end of that session, and the builder opens that session so you can see it.
The system prevents adding the same exercise to the same session twice.
Seeing every session
Click All sessions, next to Add session, to see every session side by side — one column per session, each exercise with its sets, reps and rest, and supersets shown as a green band. It's a view for reading the whole week, so nothing in it can be changed. Click any exercise to jump to it in its own session, where you can edit it. Click All sessions again, or any session tab, to go back.
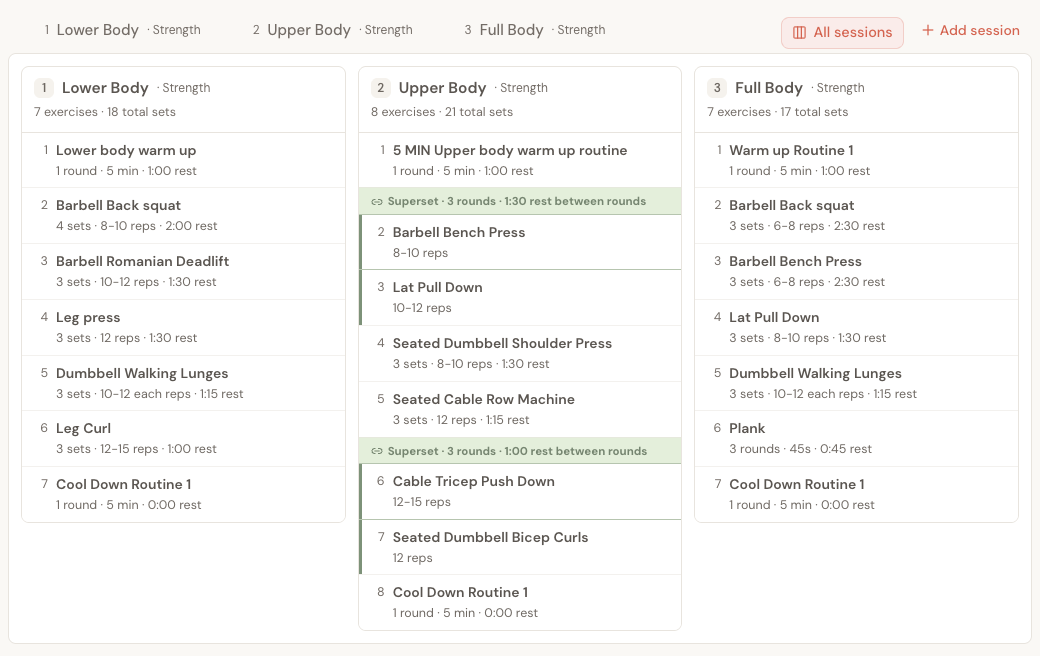
It's worth a look before you save a new plan or a new phase:
- Balance — do pushing and pulling, and front and back of the legs, get roughly equal work across the week?
- Recovery — is the same muscle group hit hard on back-to-back days?
- Load across the week — does the heaviest session land on the day your client has the most time and energy?
YouTube demo links
If an exercise in your library has a YouTube URL, a play icon appears next to its name. Clicking it opens the demo video. This is useful for:
- Reviewing proper form while programming
- The client can see these links in context when viewing their plan
See Exercise Library for how to add YouTube links to exercises.
Saving
The builder uses manual save. An indicator shows whether you have unsaved changes. Click Save to persist everything — sessions, exercises, ordering, parameters.
For new plans, the first save creates the plan. Subsequent saves update it.
AI coverage analysis
Use Analyze Coverage when you want a quick structural review of the current program before you activate it. It reviews body-region coverage, split balance, likely gaps, repeated stress, and short coach-facing suggestions.
See AI Workout Coverage Analysis for how to run it, read the report, regenerate stale analysis, and export the PDF.
Activating
After saving, activate the plan from the client's Workouts tab. Only one workout plan can be active at a time per client — activating a new plan deactivates the previous one.
Once active, the plan appears on the client's app and is available for PDF download.
Duplicating
Use the Duplicate action on any plan card to create a copy. This is the fastest way to create a progression — duplicate the current phase, bump up the volume or intensity, and save as the next phase.
The duplicate includes all sessions, exercises, and parameters.