Creating Meal Plans
The meal plan builder lets you create structured nutrition templates for your clients, complete with macro targets, individual meals, and per-food nutritional breakdowns. Clients see the active plan on their client app and can download it as a PDF.
Opening the builder
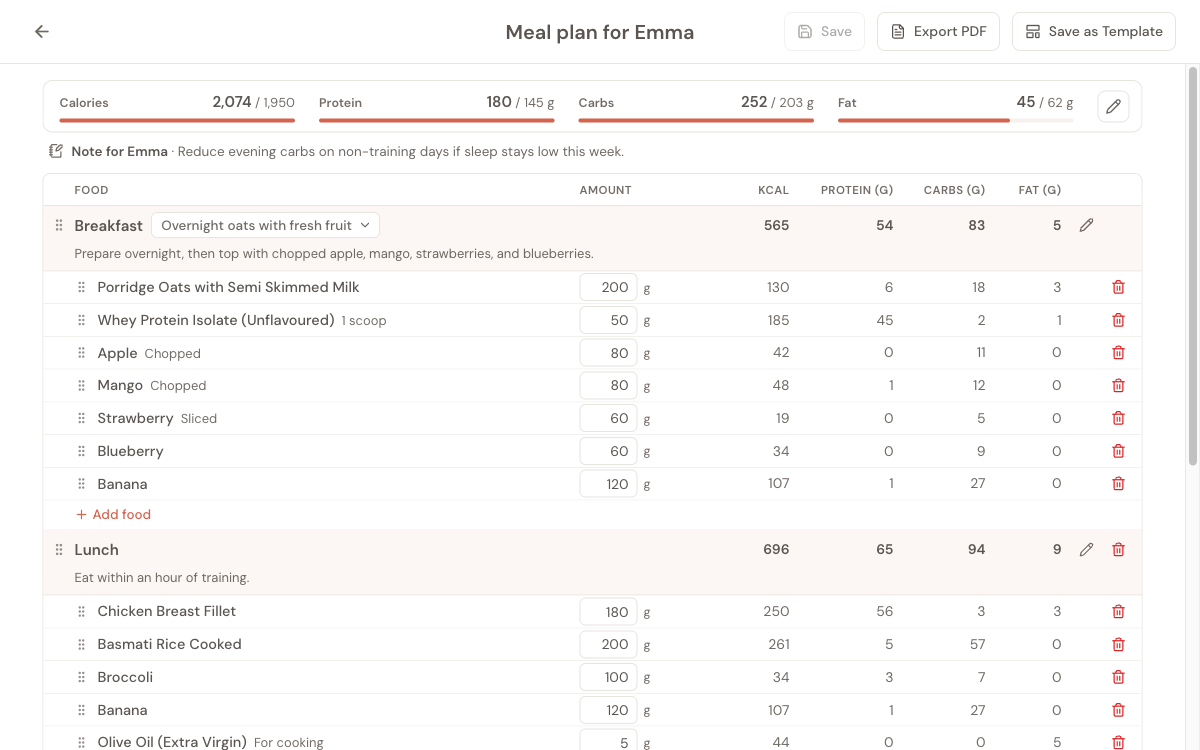
From a client's dashboard, go to the Nutrition tab and click Create Meal Plan. The builder opens full screen, headed with your client's name (for example Meal plan for Emma), with the whole day on one page:
- The targets strip at the top: the day's calories, protein, carbs and fat against your targets. It stays pinned while you scroll.
- Your note for the client on one line under it.
- The day sheet: every meal in the order your client eats it, each with its foods, their amounts and their numbers.
Setting macro targets
A new plan starts with no targets. The strip says No daily targets yet and offers two ways in:
- Calculate targets opens the calorie and macro calculator, which suggests numbers from the client's profile (age, sex, height, weight, activity level).
- Enter manually lets you type the numbers you already have in mind.
Once targets are set, each one shows what the day adds up to against the target (for example 1,843 / 1,950), with a bar that fills as you get closer. Only the main option of each meal counts (see Alternate meals). The strip shows the plain numbers and doesn't colour anything as good or bad: you know what a sensible day looks like for this client.
Beside Protein, the strip also shows the day's protein per kilogram of your client's body weight (for example · 1.8 g/kg), so you can read it the way protein targets are usually set. It updates as you add or change food. Point at it to see your target in the same unit and the weight it's based on: the client's latest logged weight, or the weight on their profile if none is logged. Clients weighed in pounds show g/lb instead. If there's no weight on file, the strip shows grams only.
To change the targets, click the pencil at the right end of the strip. Inside that window, Recalculate from client profile opens the calculator again at any time. As you adjust the macros, the protein box shows your target per kg of body weight (when the client has a weight on file), and the window shows the calorie total they add up to, and points it out if it's more than 50 calories away from your calorie target, which is a quick way to catch a typo.
You can save and activate a plan with just macro targets, no meals or foods. This helps when you want to give a client their numbers quickly (during intake or at a phase change) and add the detailed food breakdown later. The exported PDF shows the targets prominently, along with your note.
Your note for the client
Click + Add note for (followed by your client's first name) at the right end of the strip to write instructions or context for the whole plan, like "Prep lunches on Sunday" or "Drink a glass of water with every meal." The note shows on one line under the strip. Click it to change it, then click anywhere else to keep your changes (Esc puts it back as it was).
Your client sees the note in their client app and on the PDF.
Adding meals
On a new plan the sheet says No meals yet. Click + Add meal and pick a meal type:
- Breakfast, Lunch, Dinner, Snack
- Pre-Workout, Post-Workout
- Tea/Coffee, Brunch, Supplement, Supper, High Tea
- Create Custom Meal: any name you want
Meal types already in the plan aren't offered again. After the first meal, the + Add meal button sits at the bottom of the sheet.
Each meal is a lightly tinted row showing the meal's name and what it adds up to: calories, protein, carbs and fat. Its foods sit underneath, indented a step. Every meal is always open, so you can see the whole day at a glance.
To reorder meals, drag a meal by the grip on the left of its row, for example to put them in the order your client eats them.
Adding foods
Every meal ends with + Add food. Click it to open the Add food window for that meal.
- Your most used foods come first. Before you type anything, the window lists the foods you use most across all your meal plans and templates. If you haven't built a plan yet, it shows the foods most popular with other coaches.
- Each food starts at the amount you usually use. If you almost always give 10 g of olive oil, it starts at 10 g, not 100 g. Foods you haven't used before start at one serving.
- Change the amount if you need to. The calories, protein, carbs and fat on that line update as you type.
- Click Add (or press Enter in the amount box). The food goes into the meal straight away and the line shows Added. You'll see it appear in the sheet behind the window, and the targets strip updates.
- Keep going. The window stays open, so you can add several foods in a row. Click Done when you've finished.
Adding the same food to several meals. The Adding to row at the top lists every meal in the plan. The meal you started from is already ticked; tick more and each food you add goes to all of them (the line then says Added to 2 meals). Useful for foods that show up all day, like cooking oil, vegetables or a supplement.
Searching. Type at least 2 letters in Search foods. Foods you've used before come first and are marked Used before, still at your usual amount. If the food isn't in the library, click Create "…" as a new food at the end of the results, or + New food at the bottom of the window. See Food Library.
If a meal already has a food, adding it again shows a warning instead of a second copy.
Adjusting amounts
Every food has an amount box in the sheet. Type a new amount and the food's numbers, the meal's totals and the targets strip all update as you type. Press Enter or click away to keep it, or press Esc to put back the amount you started with. An empty box or a zero puts the previous amount back.
The maths is simple: if a food has 200 calories per 100 g and you set 150 g, it shows 300 calories. Every macro scales the same way.
Removing and moving foods
Click the trash icon at the end of a food's line to remove it. The meal's totals update straight away.
Drag a food by its grip to reorder it within its meal, or drop it on another meal to move it there. A meal can't hold the same food twice: you'll see a warning if you try.
Renaming a meal and adding a meal note
Click the pencil on a meal's row. The row opens for editing:
- The meal name, ready to type over.
- The option name, when the meal has alternates.
- The meal note, a box under the row for meal-specific instructions, like "Eat within 30 minutes of training."
Press Tab to move between them. Click anywhere outside the row to keep your changes, or press Esc to cancel. Once a meal has a note, it shows under the meal's row; click the note to change it.
Alternate meals
Sometimes one meal doesn't fit every day: your client might not have time to cook, or you want to give them a choice they'll actually stick to. Instead of building a second plan, you can give any meal alternates.
Hover over a meal's row and click + Add alternate meal. Give it a name (like "2 eggs + toast") and add foods with + Add food if you want the app to track its macros. Foods are optional: a named alternate on its own is a perfectly good "or have this instead" suggestion.
A meal with alternates shows a small box next to its name with the option you're looking at. Click it to see every option, with its calories:
- Switch options: click one to see its foods in the sheet. When you're looking at an alternate, the box is tagged Alternate and its foods have a green bar on the left.
- Main: the main option is what your client sees first, and it's the one that counts toward the day's targets. The strip always counts the main option, whichever one you're looking at.
- Set as main: while looking at an alternate, choose this to make it the main option instead.
- Remove alternate: removes it and its foods after you confirm.
To rename an option, use the meal's pencil (see above). Once a meal has more than one option, give each a clear name so your client can tell them apart.
When to use alternates. Offer a quick backup for busy days, a dining-out choice, or a couple of interchangeable breakfasts so a client doesn't get bored. Because you've approved every option, your client stays on plan whichever one they pick.
What your client sees. In their client app, and on the PDF, the meal shows its options as tabs. The main option comes first; tapping another shows that option's foods. No option is labelled "best": they're all choices you've approved, so your client follows whichever suits their day.
Saving and activating
The builder uses manual save: changes aren't kept until you click Save at the top right. If you try to leave with unsaved changes, the builder asks first.
After saving:
- Activate the plan from the client's Meal Plans tab (or from the plan card actions). Only one meal plan can be active at a time — activating a new plan deactivates the previous one.
- The active plan becomes visible on the client's app and available for PDF download.
Duplicating a plan
If you want to create a variation of an existing plan (maybe adjusting macros for a new phase), use the Duplicate action on any plan card. This creates an exact copy — same meals, foods, quantities, and targets — that you can then modify independently.
This is much faster than building from scratch when you're making incremental changes between phases.