Reviewing Check-ins
When you open a check-in, you get a comprehensive view of everything the client submitted — along with comparison data from previous check-ins so you can spot trends without doing the mental math yourself.
Getting to a check-in
There are two main paths:
- From your home to-do list — Click on any pending check-in item. This is the fastest way during your daily review workflow.
- From the client's dashboard — Go to the Check-ins tab and select any check-in from the list.
The review interface
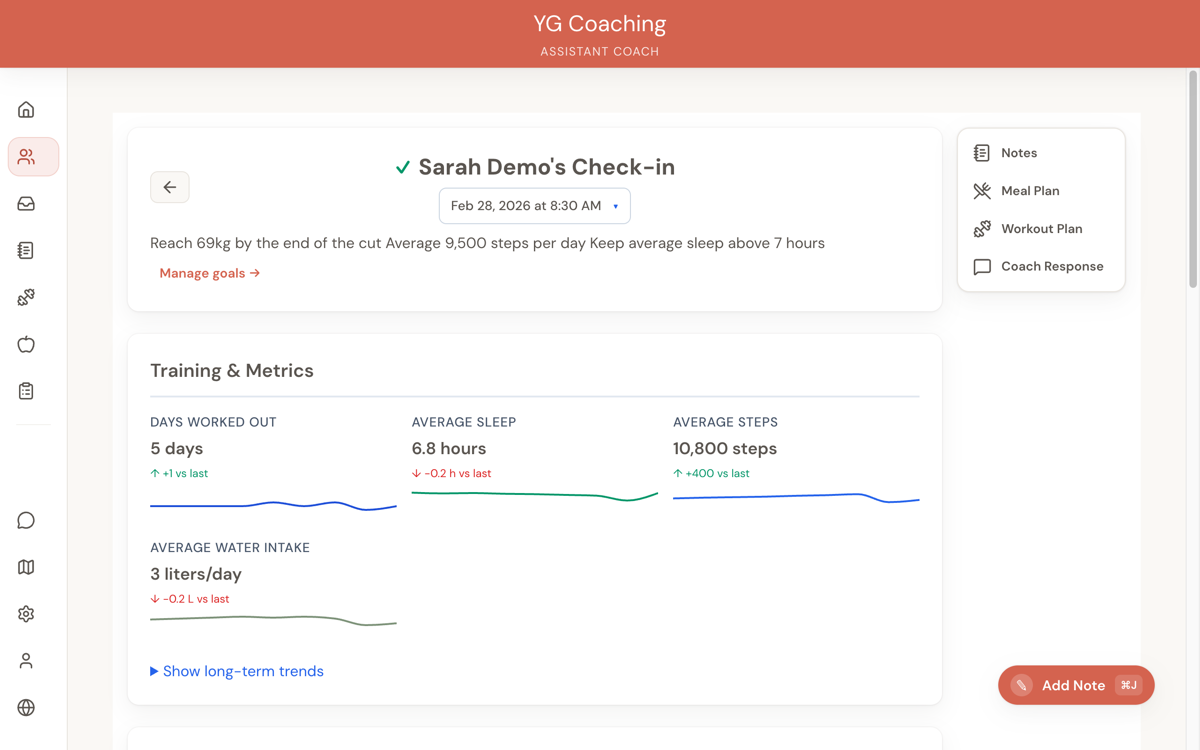
Header
At the top, you'll see:
- The client's name with a status indicator (checkmark if reviewed, clock if pending)
- The check-in date — click the dropdown to navigate between this client's check-ins
- Mark as Reviewed button (only visible for pending check-ins)
- Active goals strip showing the client's current goals at a glance
Navigation
You can move between a client's check-ins quickly:
- Arrow keys — Left and right arrow keys jump to the previous or next check-in
- Date dropdown — Click the date to see a list of all check-ins and jump to any one
Training & lifestyle metrics
Each metric is displayed with:
- Current value — What the client reported this check-in
- Delta badge — The change compared to the previous check-in (e.g., "+0.5 kg" or "-2,000 steps"), color-coded green for positive trends and red for negative
- Mini trend chart — A sparkline showing the last 12 data points, so you can see the trajectory at a glance
Below the metrics, there's an expandable long-term trends section with full charts across all check-ins.
Training this check-in
If your client logs their workouts in the app, this section shows what they actually did in the week the check-in covers — so you don't have to take a self-report on trust.
- The week at a glance — A row of the seven days leading up to the check-in. Days with a logged workout are marked, so you can see their training pattern (and any gaps) instantly.
- New personal bests — Any lift heavier than they'd done before at that number of reps, grouped by exercise. This is the objective answer to "are they getting stronger?", so you can celebrate real wins in your response.
- Reviewing a session — Tap a training day to open the full workout: every set, weight, and rep, plus any videos they attached. If they trained more than once that day, you'll pick which session to open.
- Looking further back — Use See earlier workouts to open the full workout calendar and browse previous weeks.
Because this shows the client's real logged training, you can drop the "how did your workouts go?" question from your check-in form if you'd rather not ask for it twice.
Body measurements
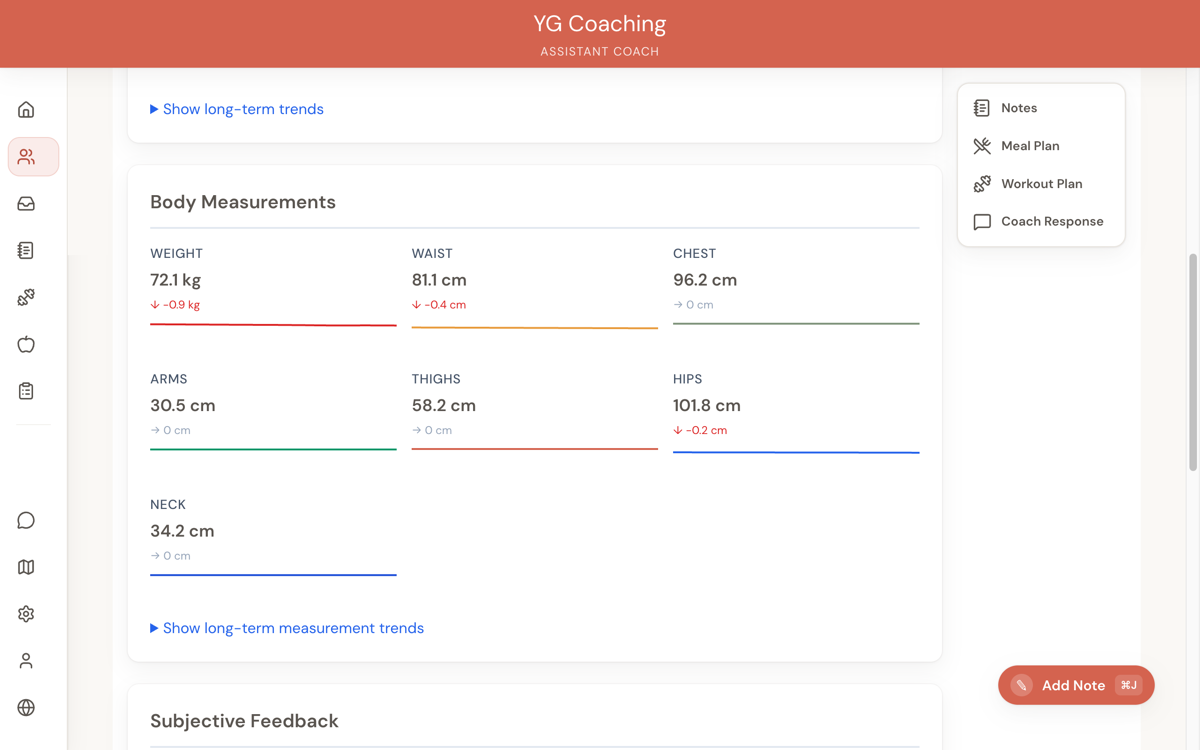
Same format as the training metrics — current values, deltas, and trends — for weight, neck, chest, waist, hips, arms, and thighs.
Each measurement has its own color in the trend charts for easy visual distinction. Missing measurements (not all clients track everything) are handled gracefully — you'll only see data that was actually submitted.
Subjective feedback
Your client's written responses to the questions in your check-in form. Displayed as question-and-answer pairs, each answer highlighted in a card for readability.
This is often the most valuable part of a check-in — it tells you how the client is actually feeling beyond the numbers.
When a client corrects a check-in
Clients can correct their latest check-in until you review it or send a reply. Their changes update the same check-in, so a mistyped weight or answer does not create a duplicate entry or an extra point in their progress trends.
You will see Edited by client on the check-in and in your to-do list. Review the corrected answers as normal. Once you mark the check-in reviewed or reply, editing closes and the client is prompted to contact you if anything else needs changing.
Progress photos stay exactly as originally submitted and cannot be replaced while editing.
Progress photos
If the client has photos, expand Progress Pictures. The Comparing against dropdown chooses what this check-in's photos are shown next to:
- Previous — The check-in just before this one. This is where it opens, and it's the quickest way to see week-to-week progress.
- Earliest — The client's first check-in. Shows the total change since coaching began.
- Earlier entries — Any other earlier check-in, newest first.
- Journey so far — Up to six photos in a row, from the client's first photos to this check-in, with evenly spaced weeks in between. It appears once there are at least three sets of photos up to this one, including photos you added yourself. The last photo is this check-in, or, on the latest check-in, any newer photos you've added since. Click the date above any other photo to swap in a different week; you'll only see weeks that keep the photos in order.
Whichever you choose, switch between Front, Side and Back with the View buttons.
When you compare two photos, the viewer includes:
- Side-by-side or slider comparison — Both images next to each other, or one over the other with a slider
- Zoom controls — Zoom in up to 5x for detail
- Rotation — Rotate images in 90° increments if a photo was uploaded at an angle
- Pan — When zoomed in, drag to move around the image
In Journey so far, click any photo to see it full screen and step through the others. Weeks without a photo for the angle you're viewing are skipped.
Photos are cached locally for performance, so switching between comparisons and angles is fast even with many check-ins.
Earliest and Journey so far are powerful coaching tools. When a client is feeling stuck, showing them how far they've come since day one can be incredibly motivating. The client's Photos tab opens on the same kind of lineup across their whole time with you — see Reading Progress Photos.
The actions sidebar
On the right side of the review screen, you'll find quick-access buttons for:
- Notes — Opens the notes drawer, showing any notes linked to this check-in. You can also create new notes here.
- Meal Plan — Opens a preview of the client's active meal plan (if they have one).
- Workout Plan — Opens a preview of the client's active workout plan.
- Coach Response — Opens the response drawer where you can write or view your response.
On mobile, these actions move to buttons in the header.
Marking as reviewed
When you've finished reviewing, click Mark as Reviewed in the header. This:
- Removes the check-in from your home to-do list
- Updates the review status indicator to a checkmark
- Records that the review is complete
- Stops the client from making further changes to that check-in
You can still access the check-in later — marking it reviewed just clears it from your pending queue.